How to create and configure Extended Named Access Control Lists (ACLs)
Before continuing, refer Introduction to Access Control Lists lesson , if you are not familiar with Access Contol Lists.
Refer Extended Access Control Lists lesson if you are not familiar with Extended Access Control List configuration IOS commands.
Refer Named Access Control Lists if you are not familiar with Named Access Control Lists configuration IOS commands.
The basic IOS command to create a named Access Control List (ACL) is shown below, which is similar to creating a numbered Access Control List (ACL).
Router(config)# ip access-list standard|extended ACL_name
The standard and extended keywords specify whether it is a Standard Access Control List (ACL) or an Extended Access Control List (ACL).
Extended Named Access Control Lists (ACLs) - Lab Practice
The following diagram shows our Extended Access Control List (ACL) lab setup. We have three routers, three switches, six workstations and three servers connected as below. The host names, IP addresses and the interfaces of the routers are shown in diagram. The IP addresses of the workstations and the servers are also shown in the diagram.
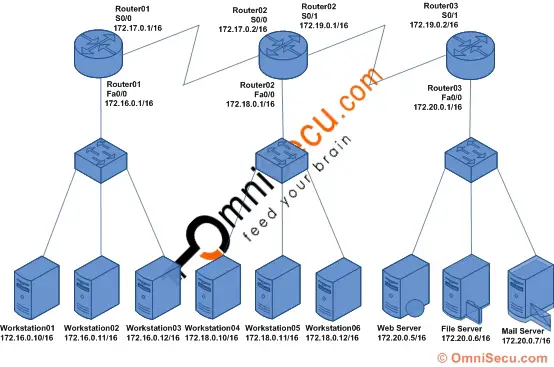
The purpose of this lab is to deny Workstation03 (IP address - 172.16.0.12/16) located at 172.16.0.0/16 network from accessing the Web Server (IP address - 172.20.0.5/16) at 172.20.0.0/16 network, using Extended Named Access Control List (ACL). Connect computers, switches and routers as shown in the figure. Configure the IP address and default gateway TCP/IP settings in all computers and servers. Configure the hostname, IP address and routing on three routers. Click the following link to learn more about configuring hostnames, IP addresses and Enhanced Interior Gateway Routing Protocol (EIGRP) in routers.
Click the following link to know where to place an Extended Access Control List (ACL). In this lab, the router near to the source network is Router01, and we have to configure Extended Access Control List (ACL) in Router01.
How to create Extended Named Access Control List (ACL) using "access-list" IOS command
To create a Extended Access Control List (ACL) , to deny Workstation03 (IP address - 172.16.0.12/16) from 172.16.0.0/16 network, from accessing the Web Server (IP address - 172.20.0.5/16) at 172.20.0.0/16 network, we use the "access-list" IOS command from the global configuration mode of Router01 (which is near to the source) , as shown below.
Router01>enable
Router01#configure terminal
Enter configuration commands, one per line.  End with CNTL/Z.
Router01(config)#ip access-list extended BLOCK_WS03
Router01(config-ext-nacl)#deny tcp host 172.16.0.12 host 172.20.0.5 eq 80
Router01(config-ext-nacl)#permit ip any any
Router01(config-ext-nacl)#exit
Router01(config)#exit
Router01#
Remember, there is an implicit "deny any" at the end of every Access Control Lists (ACL). If there is no "permit ip any any" statement at the end, above Extended Named Access Control Lists (ACL) may filter out all traffic. The "permit ip any any" permits any other IP traffic, if there is no matching deny in previous statements. Above Extended Named Access Control Lists (ACL) effectively allow all the traffic except the HTTP traffic from 172.16.0.12/16 to 172.20.0.5/16.
How to configure Extended Named Access Control Lists (ACL) to an interface using "access-group" command
The Extended Named Access Control List (ACL) created above can be applied using the IOS command shown below.
Router(config)# interface interface_no
Router(config-if)# ip access-group ACL_name in|out
The "in/out" keyword of the command is used to specify the direction in which the traffic is filtered.
The "in" keyword is used to specify that the traffic should be filtered when it arrive the router via an interface. Following diagram explains the "in" keyword. Here the traffic will be filtered as it arrives the router.

The "out" keyword is used to specify that the traffic should be filtered as it leaves the router via an interface. Following diagram explains the "out" keyword. Here the traffic will be filtered as it leaves the router.

Extended Access Control Lists must be applied close to the source network. Here the interface close to the traffic source is fa0/0 in Router01. Following IOS commands apply the Extended Access Control List (Access Control List Name - BLOCK_WS03) to the interface fa0/0 (Router01) in "in" direction.
Router01>enable
Router01#configure terminal
Enter configuration commands, one per line.  End with CNTL/Z.
Router01(config)#interface fa0/0
Router01(config-if)#ip access-group BLOCK_WS03 in
Router01(config-if)#exit
Router01(config)#exit
Router01#
If you want to remove the Access Control List (ACL) from the above interface, use the "no" form of the command as shown below.
Router01(config-if)#no ip access-group BLOCK_WS3 in